Tuesday, 13 March 2012

iMoive

Making movies by using Smartphones

Hi there!


I was researching for different ICT resources to use in the classroom. What I found was a cool app for Iphone called iMovie. Something you have to consider by using this resource is that schools don’t have a lot of money to use and that could be an issue, and I also understand that there is a variety of opinions about using or not using phones in school. But what I thought was that many kids already carry their phones around on a daily basis, why not use them in the classroom?  I believe that we educators can show our pupils how to use their phones to learn and by that let them connect to the real world. If we don’t, they are going to look for learning experience elsewhere that they can relate to.

How the resource can be used by teachers:

Teachers can use this iMovie resource for story telling or to show pictures or movies to start a theme. If I was using iMovie I would want a smartboard or another type of media board where I could show the presentation for the pupils. I would like to use the iMovie app for different kind of subjects and presentations. It could be used for making portraits, reportages, new programs, interviews or other kind of tasks were the pupils can communicate.


How the resource can be used by pupils:

The pupils could by themselves or in groups record their own movies and then show it to the class.  One task could be that there is some groups that make different movies about their school. The pupils could interview their head master, the cooking staff, the teachers and other students and then they could show it to each other in the classroom and talking about the experience. I think this kind of task could be a good way for the pupils to show what they learned about interview techniques.

  
What the recourse is:

iMovie is an app where you easy can make your own movie. The teacher needs to show how it works and explain what the task is. Then the pupils need to make some preparation work before using iMovie, planning the content and filming.

This is how it works (brief explanation):


1. Open the app and then press + to open and start a new film project.


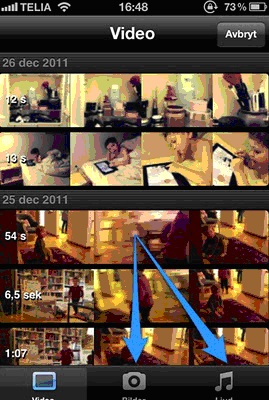
2. Insert the video from the library by pressing one of the icons.


3. Here you can change the settings, take away sounds and putting in other sounds. You can also change the theme here.


4.  Transition preferences


5. Sound effects


6. You can record your own voice and use it as a voice over.


7. You can also use pictures in the iMovie.


After you done all this, you can easily post it on to youtube or another type of media. Then the pupils can show their movie to their classmates as a presentation or in parents meeting .

By: Sofie Sturesson

(The picture is taken from http://iktskafferi.blogspot.com)

Monday, 12 March 2012

STORYBIRD

www.storybird.com

What is Storybird?

According to Storybirds homepage, it is a “service that uses collaborative storytelling to connect kids and families”. Storybird see themselves as promoters of the imagination and the whole service can be described as a literacy tool. On the homepage you can also read that “kids contextualize and imagine the world through narrative. It’s how our brains work. For us, the goal was to design a service that made storytelling effortless” (www.storybird.com).

How does Storybird work?

The service works in a simple way and the design of the site is clean cut which I think is nice. You need to know how to write and read, so younger learners might need support from an adult. You choose a few images you like and with them as an inspiration you write your own story. When you are finished you can publish your story on the site and share it with other Storybird members. You can also print it out and keep the story in your own little book. If you want you can write stories together with someone else, a friend or another Storybird member through the site.

How the resource can be used by pupils
The pupils are free to play with words and pictures on the site and in that way become inspired. They can learn how to write stories and practice a language, for example English, at the same time. In that way the vocabulary size of the foreign language will increase, as the pupil needs to use a word in the story they don’t already know and have to check it up. They also might get a better understanding of how to build a story.
They can write their own story or write together with others. If that’s the case, they can practice to communicate, for example in English, at the same time. In that way the language gets a social meaning as well.
The pupils also get to use their imaginations and I think the site can be a great way to get the children interested in writing.

How the source can be used by teachers

As a teacher you can open a teacher account on Storybird. This enables the teacher to sign up students without an email address and the account will have its own class dashboard. From there the pupils will have their own accounts and be able to write their own stories. They can also read each others stories and be able to comment on them in the “class library”.

From here the teacher will be able to see how the pupils are handling the language. It can be a good tool when the teacher wants to check what kinds of grammar mistakes are common among the children. In that way he or she gets an idea of what to teach next.

The teacher can also write stories together with the children. If there is an interactive white board in the classroom it could be helpful. The teacher could start the story and the children make up the rest. The teacher could also show a picture and ask the children what they see. In that way the pupils practice their vocabulary skills.

What to consider with Storybird

I think Storybird is a nice site with a good aim. As a teacher I would consider a couple of things though. As the children are able to write comments about each others stories, the teacher is responsible to make sure that there are no offensive comments. It is also important to make sure that all the children want to show their stories to the others. If there are children that don’t feel comfortable with this, they shouldn’t need to publish their stories on the page.

It is important that everyone finds the site joyful.


Friday, 9 March 2012

sciencekids

I want to recommend this site http://www.sciencekids.co.nz/ they also have English and mathematics sites that are really useful and popular. I would like to use their science site this time because it offers a lot of different tasks for the children to do in rather simple but still challenging English. On the site they have different tasks such as experiments, interactive games, short fact about different topics such as animals, technology, chemistry, space etcetera which means there should be possible to find topics that suits all students. They also have quizzes that the students can take online to see how much they learned and for projects there are suggestions on the site and also you can borrow images and videos to use in the projects.  For teachers they also have a folder called lessons where you can find lesson plans planned for children in the United Kingdom and their curriculum but I find them useful in the Swedish classroom too if you make smaller changes.

To use the site for the interactive games and quizzes you need computers and internet access otherwise you can print out the facts and the instructions for experiments and hand out in the class instead.  Depending on which experiments you want to do you can need other materials too such as for example scissors, papers, glue etcetera.

The resource can be used by teachers as a way to find facts in English about science topics that are reliable and written on a level that children are expected to know. Off course since the site is for native speakers the English might be on a level too high for Swedish students even in the age 10-12, but I have used it and in my experience students are willing to try even when they don’t understand all when especially if they get to start by playing the games or watch the videos and then read.  In the suggested lesson plans they have both technology based lessons and experiments that are to be done without computers which gives a lot of ideas and choices.

The resource can be used by the students as an interactive platform that combines science and English in a rather commercial free environment, where the teachers don’t have to worry about ads with dubious messages as the risk are with free of payment sites. The site provides the students with information in several different ways which gives them variety and there should be something that suits everyone depending on learning style and interest. They can work both in pairs and alone with the sites depending on if it is a bigger project or just to immerse their knowledge.

Other considerations when using the source is probably that the subjects the students are to work with should be familiar to the students before to make it easier otherwise when it comes to study a new subject in a foreign language the teachers might need to prepare the classroom so that dictionaries are available and that they get more time to read and study.

/Frida E

ICT/ A pen pal project. By Renée Cederholm
The technology in using Email is relatively simple to use and many schools have access to computers. This is a very good reason to work with Email in school in general, but specially in learning English as L2. Another, better reason to work with Emailing is of course the benefits of starting communicating by writing in English. This way of getting to know children from another country in the same learning situation wouldprobably also be very motivating for the pupils.
I would like to start this project in finding pen pals to my students. Below I have listed two communities where I hopefully may find a suitable teacher from another country that would like to start a project like this with me. (http://groups.yahoo.com/group/dogme/)
and (http://www.webheads.info/ ). (Dudeney&Hockly, 2008)
In the choice of country I considered the fact that many families in Sweden visits countries like Spain, Greece, Cyprus etc. during their holidays, so I simply made my choice from that point of view. Let´s say I would choose Spain and assume that I´ll find a teacher that would have a class in the same age group studying English.
Before starting the actual project there aresome important issues that I would take in consideration. In the contact with the fellow teacher:

  • Make sure on deadlines and time frames for Emails.
  • Discuss the language use and grouping of the pupils, if they should write in
    pairs or individual.

Preparing the pupils:

  • Ensure that they all have basic knowledge in how to write Emails. (This we have already practiced in Swedish earlier on though.)
  • Also make sure that the students are aware of the importance to remain polite, not aggressive or insulting in their correspondence. (Dudeney&Hockly, 2008)

In this case, since the pupils are very young, they will work together in pairs. The pupils are instructed to find out a couple of things about the other country. The name and size of the country, and the name and size of their city, and what they like to do in their spare time, for example. First of all they have to write a polite introduction about themselves, like their names and their ages. Then they start writing the questions. Finally there has to be a proper ending.
After receiving answers, they would have to answer the questions from the class from Spain. Depending on what the teacher and I have decided, on how much work to put in the project, this could go on longer or simply stop after this.
This could be an interesting start to a communication, which hopefully would continue though, maybe in the future the children could go on with chat, or a Skype conversation with the same pupils from Spain. Maybe even some children would become really good friends with each other this way.

// Renée

Reference:
How to Teach English Using Technology, Gavin Dudeney and Nicky Hockly, Pearson Education

Thursday, 8 March 2012

SMART Board

Hi everybody!
Technology is certainly developing fast, and provides more and more ways to share information and communicate. The use of computers, internet and smart-phones can be seen in younger ages than you thought was possible! As a teacher, it can be hard to follow the development and keep updated. Some schools have come a long way in the use of technology, while others only have a few computers with bad internet connection.
I want to give you some information about an ICT resource that can facilitate and enhance your education- the SMART Board.
What is it?
A SMART Board is an interactive whiteboard that can be connected to any kind of computers and projectors. The smart board has a touch- function, so you can write on it with pencils or your fingers. It’s different from an ordinary whiteboard since you can move, changed, reduce or enlarge the objects that you’ve written, drawn or inserted.
The program that you use with the Smart board is called Notebook, it’s included in the purchase. In the program you can plan lessons, show presentations and do follow-up. The pupils also have access to Notebook so they can prepare own presentations and see the ones you share. They can use the program at home or on the computers on the school.
What do you need?
The school has to buy the SMART Board, and to use it you also need a computer and a projector.
How can you use it in teaching?
The SMART Board can be used in all different subjects. The program contains a gallery with images divided into different areas like history, math and geography. It also includes interactive applications, sounds, videos and background pictures. In the gallery you can add your own, or the pupils, pictures. I believe these features can facilitate and enhance the teaching. Also, many big educational publishers in Sweden have started to sell interactive digital teaching materials that can be used on board.
Everything you write on the SMART Board is saved, so you can return to what you’ve spoken about before or use it again. If a pupil is sick, you can email or print your presentation and notes, or make it available to the whole class. When you use the SMART Board, you’re connected to the internet so you can visit a webpage.
I think that the use of SMART Boards makes the teaching more flexible, since you can make changes in you presentations, and add notes easier than for example Power Point. It also gives the pupils many opportunities to be involved: they can use it for problem solving and make own presentations with many different components.
There’re some products that’s not included when you buy a SMART Board but that can be purchased. One of them is the SMART Response. It’s remotes for the pupils that are connected to the SMART Board. The teacher can ask questions and let the pupils answer with their remotes. If the teacher chooses, the answers can be displayed on the board. It gives the teacher a possibility to make opinion quests, check if the pupils have understood a certain thing or even make tests. I think that this also gives the pupils a chance to make small studies in the class.
Another extra thing that can be bought is Notebook math, a program that makes it easier to create tables, graphs, angles and equations.
Links
If you’re interested in more information about SMART Boards, you can visit the webpage http://www.smartboard.se/
Here’s a film of how you use it http://www.youtube.com/watch?v=WL0hUBxTBWY
Final thoughts
If you get a chance to use one of these boards, take advantage of all the possibilities but don’t use it just because you have to. You must of course have a goal with your teaching, and can’t not only show presentations J My final advice is to let the pupils be a part of this exiting resource!

Best regards Sandra Sandqvist

Wednesday, 7 March 2012

Document camera


Document camera

Hi

I wish that all classrooms could have a document camera connected to their smart board.
By investing in a document camera to have in the classroom helps the teacher a lot. It's a time saver. The teacher are able to show all the student things at the same time without having to handing out large numbers of papers. The time the teacher saves they can a lot of devote to the pupils and lesson planning. Instead of wasting time to queue at the copier making numbers of copies before a lesson. Another major advantage is that we conserve our natural resources by not wasting paper.

How to use it?

The document camera can be used in all kind of subjects and ways. It is easy to use and it has a numbers of functions such as zoom and auto focus. You as a teacher can demonstrate different experiments on their and all the pupils can take part of what you are doing on the same time.


How can it be used in the classroom?

Example: If the teacher is reading a book to the pupils he/she can put one copy of  it on the document camera so that all the pupils can see the pictures and the text. by doing so the pupils can easily keep up and make connections to the pictures. The teacher are also able to stop at any "hard" words and they can look at the spelling and pronunciation together.

Exemple 2: If the pupils brings something to school or finds something during their break on their school yard that they want to show their fellow classmates and talk about (show and tell) it is easy for the pupil to show the whole class at the same time by putting the object under the document camera.

Pros and cons
This teaching tool is very time saving for teachers and it is a great help I believe in the classroom when it comes to show the whole class texts, objects, books etc.
By using the zoom effect the pupils may notice things on objects that otherwise can not be seen by the naked eye. Another advantage is that these cameras have a USB input for enabling students and teachers can share text and images.
Unfortunately many schools today do not have the money to invest in a smart board, and to access the document camera's effects, a smart board is required.


Therese Asplund
Vt-12
1EN30L


Tuesday, 6 March 2012

My StoryMaker


In Storymaker you can choose characters and objects and the site creates sentences depending on chosen action. It’s easy to use and a nice way for young children to create stories and learn new language. If you work with stories and tales in the classroom, this could be a useful site for assignments. I think it will be even more worthwhile if the pupils sit in pairs and interact while doing the task.

The children choose main character and the main characters goal – for example to travel somewhere, make friends with or rescue someone, find or defeat something. The follow up question then is who/what the hero/heroin will defeat, find, fell in love with etc? 
The children set up the background, choose emotions, actions, interactions and give the characters items to use. According to what the characters do – the storymaker creates sentences. The children decides what’s going to happen to hero/heroin – who they will meet and what kind of adventures that are going to take place.
Depending on what happens on the screen the children will figure out what the text means. For example, if they choose the interaction “kiss” or “fight” without knowing the meaning, they may guess by looking at what the characters do.
Because you can write your own text you may also modify the sentences to suit your story. For example, if the program types “The monkey was surprised.  The happy monkey jumped”, the children might want to change it into “The monkey was surprised and jumped”. Because they see the meaning of it, it will stimulate and improve their use of function words.
When you choose a character to talk a speech bubble appears, you write something in it and it will appear in a sentence in the text. I believe the comic-book features make it easier to understand because they are well-recognized for all.

Some considerations when using StoryMaker…

When the children finish their story it may be saved as .pdf file, but it cannot be edited again. In the end you will have a freeze frame and not the varied expressions of the characters. If the pupils believe they create an animated story this might be disappointing for them. In a way this could be good because the result is more book-like, but it also unfortunate that one can’t go back and edit. Perhaps the main characters goal hasn’t been achieved when the lesson ends? A way to avoid this is that the children create chapters instead of a complete story.

Siri Öberg